Friday, May 28, 2010

Love for Etsy

How about a pretty summer clutch to hold your chapstick and suncreen?
{Deluxe Clutch by Abba Dabba Bags, Vintage Clutch by My Vintage Cocktail, Straw and Leather Clutch by Marie's Vintage, The Kelsey by Gracey Bags, Nautical Clutch by Cathy's Totes, Red Clutch by Smith & Darling}

Oh how I wish I had...
the "Take Me to the Beach" bag by Nancy Jo Studio for our trip to Panama City. (We leave tonight!!)

Thursday, May 27, 2010

Food Library

Speaking of cookbooks, these two are my fave. Both were gifts, one from my parents and the other from Eric (smart guy!). I've discovered a lot of go-to recipes in these books and really appreciate their time saving tips. An added bonus? Each recipe has a picture and the stylish books look great on our countertop!
I'm also loving the food blogs: Macaroni and Cheesecake, Lombard Family Recipes, Liesl's Confection Dissection, Annie's Eats, Picky Palate and Bake or Break.

So tell me. What are your go-to cookbooks and food blogs? I'm looking to expand my actual and virtual food library.

Books by Color

A little Flickr fun. By Chotda and I heart Norwegian Wood, respectively. Enjoy!
Don't you just smile when you see that room above? Well, hello dog on the pretty cream couch. I'm really digging the practicality and simplicity of the cookbooks. Definitely a version of "books by color" I think I could pull off.

Tuesday, May 25, 2010

Alex's Wedding

As promised, here are pictures from my sister, Alex's wedding. The photographer, Emily Hooten, was wonderful. It was, without a doubt, the most fun wedding I've ever been to. Enjoy!

Alex getting ready. Isn't she beautiful? Alex and Ben sharing a few minutes alone before the wedding. The look on Ben's face is evident of his love. Also, her hairpiece and the trees are amazing!
Alex and I striking a sweet and silly pose.
Don't you just love the dresses, shoes and single stem flowers? Oh, and the bride's smile? Lovely.
Speaking of shoes, these puppies hurt my dogs, but they look stunning. Alex's shoes were her "something blue". Of course, the guys had to join in the fun. Why is that I find skinny legs and tall socks so cute? (My husband is second from the left).
The guestbook allowed friends and family to leave a sweet note. What a treasure!
My dad about to walk Alex down the aisle.
Ben hugging Alex during the ceremony. He couldn't resist!
The outdoor chapel, surrounded by trees with the sunlight peeking through, was breathtaking.
My talented sister, DeAnna, singing "Let's Stay Together" while the bridal party danced our way out of the ceremony. That's me and my hubbs groovin' on the right.
Alex's cake was topped with bright pink and green flowers and swirly sticks. And it was delicious! Ben's cake was surrounded by lollipops and I just thought this picture was too cute not to share.
Ben made it his mission to dance with every person in the room. As you can see, he did a darn good job!
Not to be outdone, the rest of us join in. So. Much. Fun.
Alex and Ben waiving goodbye on the boat. How romantic?

Sigh. I love weddings. And I love marriage.

Ikea Inspiration

I'm not one to be easily overwhelmed. The first time we went to Ikea, however, I had trouble catching my breath. We drove up to a shopping mall sized parking deck, rode in on the esclators, past the day care and food court, up another set of escalators where we stumbled into a plethra of sleekly styled living rooms, kitchens, bathrooms and bedrooms. I was officially overwhelmed.I absolutely adore Ikea. And while it is well worth the 2-hour drive to Atlanta (and difficulty breathing), I am thrilled to see their new ideas and inspiration website. You have to check it out!

Monday, May 24, 2010

The Light of Day

...sometimes has trouble making it into our apartment due to lack of windows. Eric's sister, Kerri, told me about a beautiful floor lamp from Anthropologie. So, of course, I went online, fell in love with that lamp and about three others (and a lampshade). Enjoy!

a2 in Review

Church was wonderful yesterday. Chris spoke on the person, power and promise of the Holy Spirit. Please see his blog for message notes or listen to the sermon here. When life "puts the squeeze on you" you can count on the Holy Spirit to be and do the following:

1. He is our constant companion (John 14:16)
2. He is our reliable teacher (John 14:26)
3. He convinces the world of it's sin, God's righteousness and of coming judgement (John 16:8)
4. He leads, guides and instructs us in the truth (John 16:13)
5. He "grooves" on glorifying and magnifying Jesus Christ (John 16:14)
6. He discloses to us the mysteries of Christ (John 16:14b)
7. He empowers believers for life and service (Acts 1:8)
8. He liberates believers from the power of sin and death (Romans 8:1)
9. He brings the resurrection of Christ to my day in and day out life (Romans 8:11)
10. He leads us to wholeness and holiness (Galations 5: 16-25)
11. He seals our salvation and redemption (Ephesians 1:13-14)
12. He confirms and reminds us that we are children of God (Romans 8:16)

He's not just all about hype. He's about giving me understanding and guidance. He's about changing me. That's what I want.

Friday, May 21, 2010

Love for Etsy

Today's Etsy post is inspired by sweet memories of reading Nancy Drew as a young girl; snuggled up in my covers (for safety, of course!) until the wee hours of the morning. Sure, this post is quirky, but that's okay. Enjoy!

Journal made from a 1960's Nancy Drew book, complete with original cover, 15 original book pages and 55 blank pages. By Pigsey Art
Hollow secret safe made from a Nancy Drew book. Has a magnetic closure so your treasures stay hidden even when the book is upright. By Secret Safe Books
Let's be honest. I love the two above creations. But I would NEVER put them out in my house. I would save them for my cool (one day) daughter who will no-doubt be a reader and a writer. The Nancy Drew books below are not upcycled, but they are pretty. I would even use these in place of the ever-so-popular decorative Reader's Digest books. From Home Spun Style
Did you read Nancy Drew books? What quirky Etsy finds do you love?

Tuesday, May 18, 2010

Kitchen Staples

I love to cook, but, cooking on a regular basis requires planning and organization. I've found that a lack of said planning and organization results in one of two things: eating out or (worse) going to the grocery store with total disregard to what we have at home.
.
Luckily, these pretty pantries are inpiring me.

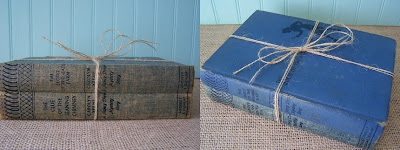
In an effort to save money (and not be wasteful!) we are trying to use everything in our pantry and refrigerator. I'm actually enjoying this! Last week, I came home to a seemingly sad dinner situation only to scrounge up enough ingredients for a chicken pesto pasta. Yum!

I'm still learning, though. I need a better understanding of pantry staples and a more organized system. What suggestions do you have for me?

Monday, May 17, 2010

Plant a Tree

Or, if you live in an apartment, make a terrarium.

About a month ago, I came across The Little Red House and couldn't stop reading. When I found her Outside In post, I knew this was a project I wanted to tackle. Saturday morning, we ate yummy Italian at Joe's and headed out to add a little green goodness to our apartment.

We visited the local thrift store to grab a third jar (the first two were given to us by Eric's sweet mom, who scoured her Goodwill to find the beauties). Then we trapsed half-way around the world to gather the rest of our supplies: rocks, dark potting mix, active carbon, succulents and moss. (Okay, slight exaggeration - everything was easy to find except the active carbon - the pet store is apparently where it lives).

We made a fun mess in the living room putting these together. Eric has quite the green thumb (for which I am grateful) and suggested that we pot the moss seperately since we were happy with the mossless terrariums. These plants look lovely in our apartment and the old jars give it such a homey feel. Enjoy!

Friday, May 14, 2010

Love for Etsy

In a few weeks, oil-pending, my husband and I will head to the beach for a weekend with his family. This got me thinking about swimsuits, thus inspiring today's Etsy post. I love how vintage swim wear embraces curves and is feminine to the core. The string bikini's got nothing on these sultry suits.

{Two Piece Bikini by Klaudia Kuhn, Portofino Two Piece by La Drama Queen, Red Retro Halter by The Red Dolly, V-neck One Piece by Ava Bell Designs}

Thursday, May 13, 2010

Yes, Please

Oh, I'm sorry. You didn't ask me if I wanted yummy cupcakes served on a pretty pedestal to brighten up my Thursday? Whoops.

Then this post shall serve as a reminder to myself: make a new treat and create something beautiful to put it on. I love the simple things.

Wednesday, May 12, 2010

Lift Up Nashville

Less than 2 weeks ago, Nashville, TN received more rain in a 2 day period than they usually receive in 6 months. The resulting flood devestated businesses and homes and left more than 30 people dead. Tornadoes soon followed, only increasing the damage to the city. My husband's family lives in Nashville and we are overwhelmed to learn of what people are going through. Pictures of the rising water levels and sunken roads have left us speechless.

Yesterday, I was excited to read about a new project by Eric's cousin, Derrick Castle, freelance designer of Nashville Mafia. He recently joined with other local artists to create Lift Up Nashville, a collection of posters selling for $10, with all proceeds going directly to Flood Relief - Metro Nashville Disaster Relief Response Fund. Eric and I are ordering ours today and encourage you to do the same.

Please consider the lives affected as you lift up Nashville in your prayers.

Tuesday, May 11, 2010

DIY Framed Wall Art

I am ready to spruce up our sad, off-white apartment walls. But it's so expensive! The DIY projects below are cost-effective, unique and fun. Enjoy!

Framed Wallpaper
I love framed wallpaper - both big and small! This yellow wallpaper, discovered via The Style Files brings life and symetry to the white walls, couch and lamp. This red floral wallpaper, discovered via The White Balloon is a perfectly eclectic pop of color. I am drawn to this Baroque wallpaper from designer Barbara Hulanicki. I would like to hang it in a medium-sized frame in our diningroom.
Multi-Framed Photo
When I first saw this on TwoEllie, I was taken by the display as much as the photograph itself. Paula's husband, Kellen Jacob, captured their family's favorite spot at the beach, enlarged the photo and then cut it to fit 6 Ikea frames. I would like to create a similar display to go above our bed. Lovely.
Framed Botanicals
Oh my, how neat is this project from Design Sponge? I am sucker for nature inspired art. Simply gather your materials and follow this easy how-to guide. I would like to hang these in our kitchen or our sunroom (if we had one).
Framed Maps
Maps are so nostalgic. While in college, Eric's roommate hung an old map of Chattanooga in the kitchen. It always made me happy to see the weathered, brown paper. I am in love with the colors and sizes of all of these maps, discovered via
Room Remix and The Zhush. I would like to frame a map and hang it in our livingroom or guest bedroom.
What do you think of these DIY framed wall art projects? What other DIY home projects do you love?

Monday, May 10, 2010

Strawberry Limeade Mini Cupcakes

I'm so sad because I don't have an individual picture of these cupcakes. They were a party favorite and I will definitely be making these in the future. The original recipe makes regular sized cupcakes. I made a third of the recipe which equaled around 20 mini-cupcakes. I wish I had made more!
Strawberry Limeade Cupcakes
For the cupcakes:
1 cup cake flour
1/8 tsp. salt
1/4 tsp baking powder
1/8 tsp. baking soda
1/3 cup unsalted butter, room temp
1/3 cup sugar
2 T plus 4 tsp limeade concentrate
1 egg
1/4 cup milk

For the lime syrup:
1/4 cup limeade concentrate
2 T plus 2 tsp confectioners’ sugar

To make the cupcakes, preheat the oven to 350 degrees F. Line two mini-muffin pans with paper liners.
In a medium bowl combine the cake flour, salt, baking powder and baking soda. Stir together and set aside. In the bowl of a stand mixer fitted with the paddle attachment, cream the butter until smooth. Add the sugar and beat on medium-high speed until creamed. Add in the limeade concentrate and mix to incorporate. Add the eggs one at a time, scraping down the bowl between additions. Add in the flour mixture in thirds, alternating with the milk, beginning and ending with the flour mixture. Mix ingredients just long enough to incorporate but no longer.
Divide the batter evenly between the prepared cupcake liners. Bake for about 7-9 minutes or until a toothpick inserted in the center comes out clean. Allow to cool in the pans for 5-10 minutes, then remove to a wire rack over wax paper to cool completely.
Once the cupcakes have cooled, whisk together the limeade concentrate and confectioners’ sugar in a small bowl to make the lime syrup. Poke several holes in the top of each cupcake with a skewer and pour the syrup over the cupcakes, allowing it to soak in.
Frost cooled cupcakes (recipe below). Garnish with lime slices and strawberry slices, if desired.

Fresh Strawberry Buttercream Icing:
1/3 cup unsalted butter, room temp (=5 T plus 1 tsp.)
1 and 1/3 cup powdered sugar, sifted
1/3 cup finely chopped strawberries
1/4 tsp vanilla extract

Beat butter and 1/3 cup powdered sugar on medium speed for 1 minute. Add vanilla and strawberries and beat for 1 minute. Adding 1/3 cup at a time, add the remaining powdered sugar.

Lemon Icing Thumbprint Cookies

So, I lied. I did not post a dessert recipe each day last week. I made it to Wednesday. The wedding was a BLAST - the bride beautiful, the groom a sweetheart and the dancing just plain fun. Now that I'm back to normal life, I'll post the last two recipes today. Enjoy!

These lemon icing thumbprint cookies were originally chocolate thumbprint cookies by Macaroni and Cheesecake. I already had enough chocolate going on, so I switched it up and made a tart lemon icing. They are a nice addition to a sweet table of treats.

Lemon Icing Thumbprint Cookies
Cookies:
1 1/2 sticks unsalted butter
1/2 cup confectioners' sugar
1/4 teaspoon salt
1 teaspoon pure vanilla extract
1 1/4 cups all-purpose flour

Pre-heat oven to 350 degrees. In the bowl of an electric mixer fitted with the paddle attachment, beat together 1 stick butter, sugar, salt, and vanilla on medium-high speed until smooth, about 2 minutes. Beat in flour, beginning on low speed and increasing to medium high.Roll dough by teaspoonfuls into balls, and place 1 inch apart on an ungreased baking sheet. Bake for 10 minutes, remove from oven, and press thumb into tops of cookies to make indentations. Return to oven, and bake until light brown on the edges, 7 to 9 minutes more. Remove to a wire rack to cool.

Lemon Icing:
I cup confectioners' sugar
Lemon juice

Combine confectioner's sugar with lemon juice to desired consitency and taste. Set in the 'fridge for a few minutes to allow icing to thicken. When cookies are cool, fill the thumbprints with the lemon icing.

Wednesday, May 5, 2010

Chocolate Covered Peanut Butter Cheesecake Bites

Today's post is another chocolate covered goodie. I do not usually like cheesecake, but I LOVE peanut butter and the two combined with chocolate is heavenly. This recipe also comes from Macaroni and Cheesecake. Please see her post as my pictures do not really do it justice. I should also add that although this recipe is time-consuming (it has to be refrigerated overnight) it's surprisingly quite simple to make.

Chocolate Covered Peanut Butter Cheesecake Bites

Cheesecake:
1 1/2 cups dark brown sugar
1 1/2 pounds cream cheese, at room temperature
1/2 cup heavy cream
2 large egg yolks
1 tablespoon vanilla extract
1 3/4 cups creamy peanut butter

Chocolate Coating:
5 tablespoons vegetable shortening
12 ounces semisweet or bittersweet chocolate chips

For the Cheesecake:
Position a rack in the middle of the oven and preheat to 325 degrees F. Line a 8 by 8-inch baking pan with foil letting long flaps overlap on each side. Spray foil with nonstick spray.
Break up the brown sugar to remove all lumps. In a standing mixer with the paddle attachment, beat the cream cheese and sugar on medium speed until very smooth. Add the cream and beat slowly; then add the yolks and vanilla mixing until just combined. Gently stir in peanut butter. Take care not to over beat the mixture; this incorporates too much air and causes the cheesecake to crack.
Pour and evenly spread the batter in the prepared pan. Bake for 15 minutes. Open the oven to release some heat, then lower the temperature to 200 degrees F. Continue to bake the cheesecake until the outside is set but the center is still loose, for about 45 minutes.
Turn off the oven, and cool cheesecake in the oven for 45 more minutes.
Cover and refrigerate at least 8 hours or overnight.
Lift cheesecake from the pan by lifting up the foil.
Transfer to a cutting board. Cut into 1 1/2-inch cubes.
Stick a wooden pop stick halfway into each bar and freeze for 1 hour (optional).

For the Chocolate:
Meanwhile, put the shortening and chocolate in a medium heatproof bowl. Bring a saucepan filled with an inch or so of water to a very slow simmer; set the bowl over, but not touching, the water. Stir the chocolate occasionally until melted and smooth. Remove from the heat and let cool slightly. (Alternatively, put the chocolate in a medium microwave-safe bowl. Melt at 50 percent power in the microwave until soft, about 1 minute. Stir, and continue to heat until completely melted, about 1 minute more.)

Assembly:
Holding two forks side-by-side, dip into chocolate and drizzle over cheesecake bites. Let stand on waxed paper to set, about 5 minutes. Serve cold (straight from the fridge), or freeze up to 2 weeks. Frozen bites make a cool summer treat, or can be allowed to temper for 10 minutes at room temperature before serving.

Tuesday, May 4, 2010

Cookie Dough Truffles

Today's dessert recipe features cookie dough truffles from the scrumptious blog Macaroni and Cheesecake. These little babies remind me of sneaking a bite of dough when my mom was making cookies growing up. Even better though: they are dipped in chocolate and contain no eggs!

Cookie Dough Truffles
-1 cup all purpose flour
-1/4 tsp salt
-dash of cinnamon
-1 stick butter, softened
-1/2 cup brown sugar
-1/4 cup sugar
-1/2 tsp vanilla extract
-3/4 cups mini semi-sweet chocolate chips
-1/2 lb. semisweet chocolate, coarsely chopped
In a medium bowl combine the flour, salt, and dash of cinnamon. In a second larger bowl, beat together the butter, sugar, brown sugar, and vanilla extract until creamy. Slowly beat in the flour mixture until smooth. Stir in the chocolate chips. Roll the mixture into quarter size balls and lay on cookie sheet lined with wax paper. Chill for several hours or freeze for 15-20 minutes until firm. Melt chopped chocolate in the microwave in 30 second intervals. Gently dip the cookie dough ball into the candy coating by placing it on a fork and rolling in the chocolate until coated. Once covered remove and softly tap the fork on the side of the bowl until the excess chocolate falls off. Place on parchment or wax paper until set.

Monday, May 3, 2010

May Calendar

Once again, I am giddy to post this month's calendar, designed by Silhouette Jess. She printed hers on "brown paper bag" and I am inclined to do the same. In the meantime, I'll print mine on the orange paper from my "soda-pop" collection. Download and print the May calendar for free here.


As always, if you print the calendar, please visit Jess and tell her how much you love her work.
Related Posts Plugin for WordPress, Blogger...